
Last night was my first night to go out with friends after work. It was my friend Scott's 26th birthday, so I decided to dust off my old sweet dance moves and bring them back out to liven the party.
These moves can be performed with and without an ankle injury.
 You can see how much space the distraction therapy adds to the joint. We haven't seen that much space in my ankle in almost two years. While it feels awkward and painful to walk on 6 k-wires and 2 half screws, it's simply amazing to be able to walk with absolutely zero ankle joint pain.
 The lateral view shows the same massive amount of healthy space. This is exactly what's needed to promote cartilage growth. Compare this space to what I was dealing with in June when I posted about my Swiss Cheese Ankle. It's a significant improvement.
 One hole is used to insert a camera -- the arthroscope -- and another hole on the opposite end of the ankle is used to insert instruments to clip, chew, and claw away pieces of bone and scar tissue to clean up the joint.
 Here you can see one of the instruments used to clean up the joint. Most of the arthroscopic work was done on the lateral side of my tibia to remove bone spurs (osteophytes) that had built up from bone rubbing on bone. It's basically a callous on your bone.
 To perform ankle arthroscopic surgery, the joint needs to be distracted. By the time Dr. Jeng was performing this part of the surgery, my external exfixator was likely already installed and pulling the joint apart 5mm. Saline is usually pumped into the joint to keep debris out of the view of the camera.
 This is a picture of a barren wasteland.
 I'm not sure how this picture of a geological cave ended up in my arthroscopic image set. This can't be an ankle.
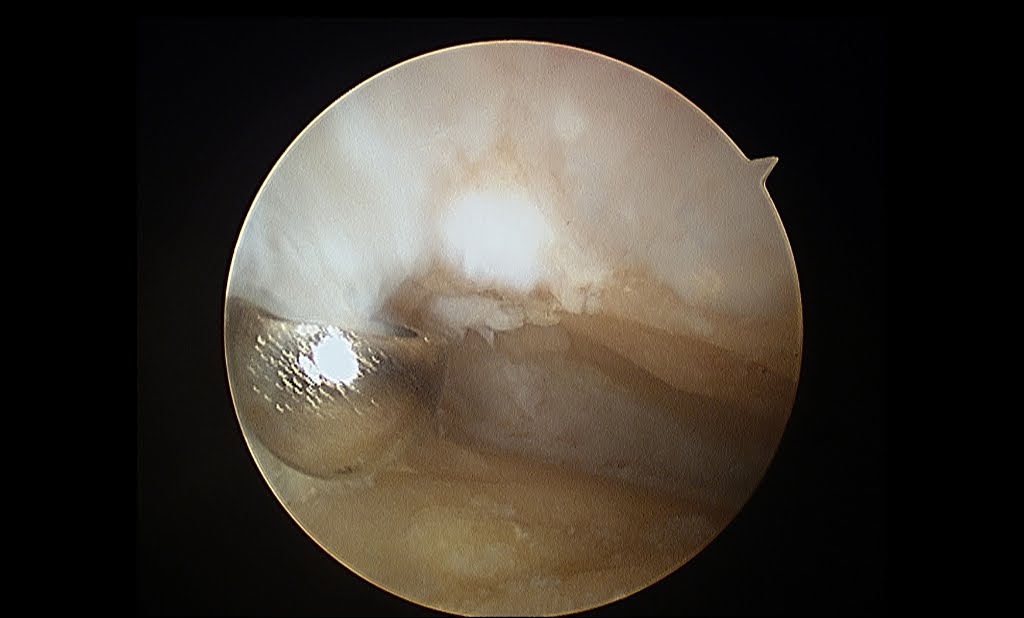
 This view, however, is a promising image. I see several patches of cartilage still holding on for dear life. Maybe we'll get some growth out of this patch. I believe you can see one of the malleoluses in the background -- I'm just not sure if it's the tibia or fibula malleolus (the boney part that sticks out on either side of your ankle).
 Another cave picture. Not a piece of cartilage in sight. I like how some of the bone has brown spots. And by like, I really mean it's terrible and I hate it.


 This was one of the pin sites we were a bit concerned about. It's red and irritated -- probably because it runs through the muscle used to pull the foot up. I've been prescribed an antibiotic as a precaution just in case there's an infection brewing.


This morning I had my second follow-up visit with Dr. Jeng. This time around, we remembered a thumb drive to bring back the X-Ray and arthroscopic images taken during my surgery.
My ex-fix will be removed on Thursday, November 3rd -- just around the corner. I was not able to convince Dr. Jeng to let me stay awake and take video during the procedure this time -- he thinks it'd be too painful.
But I was persistent -- or, more likely, I was annoying -- and got him to meet me half way. He conceded that I could setup a video camera on a tripod during the removal procedure. Hopefully we can get him to provide some good narration to provide some educational value and insights in addition to the awesome gore we'll see when the wires and screws are removed from my leg and my ankle snaps back 5mm into its socket.
Now on to the pictures from the August 15th surgery.
 You can see how much space the distraction therapy adds to the joint. We haven't seen that much space in my ankle in almost two years. While it feels awkward and painful to walk on 6 k-wires and 2 half screws, it's simply amazing to be able to walk with absolutely zero ankle joint pain.
 The lateral view shows the same massive amount of healthy space. This is exactly what's needed to promote cartilage growth. Compare this space to what I was dealing with in June when I posted about my Swiss Cheese Ankle. It's a significant improvement.
Now on to the arthroscopic images. I thought it might be useful to provide a quick diagram of how ankle arthroscopic surgery works.
 One hole is used to insert a camera -- the arthroscope -- and another hole on the opposite end of the ankle is used to insert instruments to clip, chew, and claw away pieces of bone and scar tissue to clean up the joint.
Before we go on, keep in mind that normal articular cartilage is usually shiny, smooth, and milky white. You will not be seeing normal cartilage, if any, in the following images.
 Here you can see one of the instruments used to clean up the joint. Most of the arthroscopic work was done on the lateral side of my tibia to remove bone spurs (osteophytes) that had built up from bone rubbing on bone. It's basically a callous on your bone.
Whatever it was -- it caused the most amount of pain. Unfortunately, while removing bone spurs helps reduce pain in the short term, it's by no means a long term fix to ankle arthritis.
I believe the bottom bone in the picture above is the talus. You can see some cartilage, but it's not smooth, congruent, or shiny.
In fact, it's barely hanging on.
 To perform ankle arthroscopic surgery, the joint needs to be distracted. By the time Dr. Jeng was performing this part of the surgery, my external exfixator was likely already installed and pulling the joint apart 5mm. Saline is usually pumped into the joint to keep debris out of the view of the camera.
 In the picture above, you can see a patch of cartilage that seems to be somewhat more healthy than the first image. I suspect this is the medial side of my ankle (the inside part) where I have no arthritis symptoms at the moment.
 This is a picture of a barren wasteland.
 I suspect this is the lateral (outside) side of my ankle. The metal instrument you see was used to remove the bone spur from the part of my tibia and talus causing me issues.
Dr. Jeng reported taking out the bone spurs was like taking a hot knife through butter -- not a good sign. In healthy bone, it's very difficult to remove osteophytes. This, along with the non-union last year and the incomplete union this year, all suggests operations like fusions and ankle replacements lead down roads of more revision surgeries, pain, and frustration.
Quick tangent -- did you know that for half of my marriage with my wife, Brooke, we've been dealing with this ankle? We're ready to be done.
 I'm not sure how this picture of a geological cave ended up in my arthroscopic image set. This can't be an ankle.
 This view, however, is a promising image. I see several patches of cartilage still holding on for dear life. Maybe we'll get some growth out of this patch. I believe you can see one of the malleoluses in the background -- I'm just not sure if it's the tibia or fibula malleolus (the boney part that sticks out on either side of your ankle).
 Another cave picture. Not a piece of cartilage in sight. I like how some of the bone has brown spots. And by like, I really mean it's terrible and I hate it.
So that was the view inside the ankle. It's a lot to take in. So while you're digesting that, here's what the pin sites looked like today.


 This was one of the pin sites we were a bit concerned about. It's red and irritated -- probably because it runs through the muscle used to pull the foot up. I've been prescribed an antibiotic as a precaution just in case there's an infection brewing.
Now what about this million dollar idea?
My boss is awesome. In one weekend, she crocheted the first external fixator cover ever created -- in my aluma mater colors, no less.


How awesome is this?
Love the moves, love (hate?) the close-up bone spurs, and love love LOVE the TU ex-fix cover. :)
ReplyDelete